The Ultimate Guide to Creating Seamless Transitions in Open-Plan Living Spaces
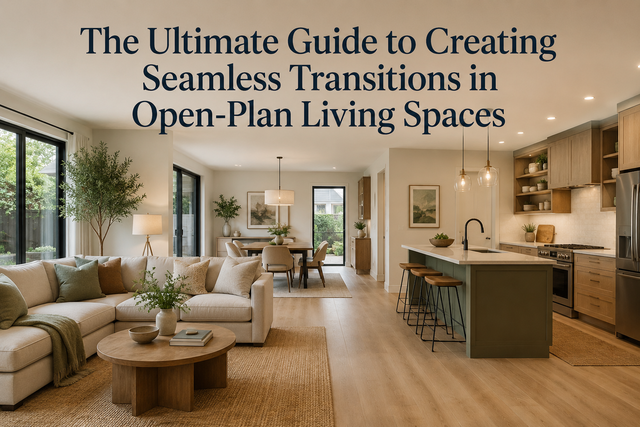
Choosing the best flooring for an open floor plan isn’t as simple as picking the material you like best. The decision depends on what goes on in the different zones of your open-plan zone, transitions between each zone, and what’s below your floor. Here’s a guide to help you.
Before we begin, remember this one rule: use only one type of floor throughout your open-plan space. Two types of floors split a space in half, visually, and the seams between them will never stay clean. If you’re keen to try two types, add a rug instead to mark one zone from another.
Table of Content
- Understanding Visual Zoning Before You Touch the Floor
- Getting the Subfloor Right Before Anything Else
- Choosing Materials For Each Zone
- Managing Expansion in Large Open-Plan Spaces
- Underfloor Heating and Material Compatibility
- Acoustic Performance in Open-Plan Spaces
- Plank Orientation and Natural Light
- Executing a Mixed-Material Transition
Understanding Visual Zoning Before You Touch the Floor
Visual zoning involves using various types of floors to indicate transitional spaces between different functional areas instead of building walls. When executed properly, the floor subtly indicates you’re moving from the hard-wearing kitchen ‘zone’ into a different space for diners or loungers. When it’s not executed properly, one material is brutally cut off and replaced with another for no apparent reason and it looks like the contractor miscalculated quantities and you thought, they’re seven tiles short.
First off, what are your zones and what do you honestly need from your floors? We will stipulate kitchen floors need to handle water, grease, and typically are the hardest-wearing floor in the house because of the traffic. The dining floor sits roughly between the two and the zone barrier will be the height of the chairs. The living floor tends to need to feel warm and comfortable underfoot because if there are crumbs somewhere in the house, they will be there.
Two zones, especially in renovations, that want a common middle floor or your eye will read tiny house, is a pretty typical design consideration. The best rule of thumb for this is to keep your contrasts deliberate. The visual contrast between products is the most common natural zone ‘barrier’. If you’re running porcelain for example through the kitchen and thinking about transitioning into some kind of wood-based product through the rest of that floor, the natural contrast between those products is your ‘zone’ marker. Don’t worry, you don’t need a step, a threshold bar, a color change in the wall, the floor does the work, and that’s actually quite easy.
Getting the Subfloor Right Before Anything Else
This is the point at which most DIYers throw in the towel and call in a pro. Tile-to-anything transitions are almost always a conundrum because our industry does a terrible job of recommending what to do about them.
The fix is in the detailing. Tile joints don’t match wood joints. Tile expansion and contraction capabilities don’t match wood expansion and contraction capabilities. And tile and wood certainly don’t install on the same horizontal plane. What you need is an intermediary material that can cope with the endless shifting-and-sliding game being played by the two surfaces either side of it. This ‘transition’ material can be rubber, timber, plastic, metal or more tile. It can even be pigmented to make it almost disappear or accent-colored to make a feature of it.
The tough bit is designing this transition joint so it actually accounts for what’s going on between the two areas of flooring it’s supposed to be marrying up. And the only way to design that joint properly is with direct site measurement. Just like the height, the subfloor, and the detailing, this is a contractor-level detail that, if not done properly, can ruin the look of your renovation. Yet armed with a laser measure, a digital camera, and a little bit of soaking time on a manufacturer’s website, you could easily steal the work a pro does for a fraction of the cost.
Choosing Materials For Each Zone
Porcelain tile is best in your wet zones, kitchens, utility areas, spaces near bi-folding doors that open onto your garden. It is the practical default, and contemporary porcelain is so good that you can now buy products that reach a PEI (Porcelain Enamel Institute) rating of 5 and are just as dense, dimensionally stable, and non-porous as stone. They are easily sufficient for commercial applications, which means they can handle the mechanical wear that your kitchen floor will take. Moisture absorption 0.1 percent so staining isn’t a worry, and frost-proof as standard so your bi-fold tiles won’t become a slippery danger through the winter.
Speaking of bi-fold, one good reason for considering tile is that you may need an expansion joint at the threshold of those doors where your tiles will meet your inside-on-the-same-level bi-fold track. If you run a floating wood floor directly to the threshold, you’re creating a weak spot where wobbling tiles can knock against rigid planks, and possibly crack. That joint can be reduced by using an uncoupling product, but it isn’t going away entirely.
My other reason for suggesting tile open-plan is that they make a small room look bigger because the grout lines define a regular grid that your eye naturally uses to measure the size of the space. Large-format tiles (600x600mm or bigger) are the ones to use in an open-plan layout for exactly the same reason: they reduce the number of grout lines visible across a wide sightline.
Which is why if you must have a wood floor, it goes in the living and dining zones. Wood will never be as rigid as stone (which is why it’s so kind underfoot) and a weak-bearing porcelain in a wide-open area with low-supporting use isn’t going to perform well. You need tiles down, not buckling, to support the island. However, engineered wood flooring will handle the situation better than solid wood.
Managing Expansion in Large Open-Plan Spaces
Wood-based floors expand and contract according to changes in temperature and humidity. The perimeter expansion gap, usually around 10-15mm, is enough to manage this in a standard room. But in an open-plan space running longer than 8 to 10 meters in any direction, the cumulative expansion over that distance can be more than the perimeter gap alone can absorb.
The answer is a mid-floor expansion joint: a controlled break in the flooring that gives the material somewhere to move. The difficulty is making it look intentional rather than like an issue you couldn’t get around.
Cork expansion strips are the most visually neat option for most residential projects. Cork is flexible, and compresses and recovers with the movement of the floor, and it comes in widths that match typical grout joint sizes, so placed at a natural zone boundary (where the tile meets the wood, for example), it reads as a deliberate design detail. Low-profile aluminum transition bars are the alternative if you need something more durable, and modern profiles sit close enough to flush that they don’t read as a trip hazard.
Underfloor Heating and Material Compatibility
Underfloor heating is pretty much standard in open-plan extensions and new builds. Radiators struggle to provide heat across such large, wall-free spaces, without it just rising to the ceiling. UFH does it evenly. That’s not to say all flooring materials are equal when it comes to working with a heated subfloor, though.
Porcelain tile is the most thermally efficient and anecdotally the most liked material to have underfoot with underfloor heating. It’s nice and cold underfoot in the summer and near-effortlessly warm in winter. It’s a brilliant heat conductor and alsofairly conductive when it comes to transmitting the heat through to a room. Wood and wood-based materials are less conductive and, more importantly, can be less stable, as they can both swell and shrink in reaction to ambient heat. However, they’re not a no-go with UFH. The only differences you’ll notice are that they take a little longer to heat up (so you might need to plan this into your use of a thermostat timer) and they might require an expansion gap around the perimeter if they’re solid wood.
The drier the subfloor when you install any of these materials, the better. And, likewise, the lower the overall floor temperature (which can never exceed 27°C), the safer it will be from the wood warping. N.B: This is also true of bathroom humidity on both counts.
Acoustic Performance in Open-Plan Spaces
Very large, hard-floored rooms lack any form of sound insulation causing noise to bounce off surfaces. This makes it a lot harder to have conversations, as it seems like you’re almost yelling, with the added problem of a lot of open-plan living rooms close to kitchens, where noisy washing machine appliances can carry straight across the room.
A relatively easy method of soundproofing a room is to add an acoustic underlay beneath the wood-based areas. By installing high-quality acoustic underlaying under the engineered wood in the living and dining room, you can reduce the impact noise (footfall) and airborne sound. This won’t make the room soundproof, but it does help take the edge off the echo, which large open areas generate.
Soft furnishings are an additional part of this layer. Rugs, upholstered furniture, and curtains all work to compound this added layer. A large rug in the living area on the floor does acoustic work as well as visual work as it defines the zone and absorbs sound.
Plank Orientation and Natural Light
The way you lay your floorboards has an impact on how the room feels from every perspective. The recommended practice is to lay planks parallel to the source of main light, typically the longest wall or the wall with the most substantial windows or bi-fold doors. This has the effect of making the room appear to pull away from the light source, which accentuates depth and helps to give an impression of a bigger space.
In open-plan designs with light entering from multiple aspects, run planks in the direction of the primary view or toward the room’s main entrance. The consistency of plank direction running across the wood and tile zones, even if a step is used in the tile layout, creates a visual continuity that binds the spaces together.
Matte finishes work better with natural light in most open-plan scenarios. High gloss reads well in smaller areas but can look dirty due to micro-abrasions, imprint the sole of a foot or heel, and naturally reflect light unevenly on the extensive facet of floor in view in open-plan situations.
Executing a Mixed-Material Transition
If you want the zone boundary to be a feature rather than a functional necessity, a mixed-material transition gives you that. Running hexagonal mosaic tiles in a transition band between the large-format kitchen tile and the living room wood planks, say, a 300mm to 400mm wide strip, gives you a contemporary detail that’s doing genuine design work.
The technical challenge is that the mosaic tile, the large-format tile, and the wood plank all need to land at the same finished height. This requires careful subfloor planning at all three junction points. The mosaic sits on a thinner adhesive bed than the large-format tile, so the subfloor under it may need to be built up slightly. Work out these heights on paper before any adhesive goes down.
The result, when it’s executed well, is a floor that tells you exactly where you are in the space without needing a change in ceiling height, wall colour, or furniture arrangement to make the layout legible.
The floor in an open-plan space isn’t just a surface, it’s the structural logic of the layout made visible. Getting the transitions right means making decisions that are technical, material, and visual all at once. The projects that look effortless are the ones where someone did that thinking early, before the first tile went down.